Friday 28 December 2012

Negotiated Study 1- Finished Backgrounds & Animatics

After a long period of work over the Christmas holidays, I'm pleased to say I got tons of stuff done. I finished all the SketchUp models I wanted to do, as well as my two collections of animatics.

Here are my finished backgrounds:

Alexandre's Server Room

Bryant's Museum

Bunty's School Stadium

Dorian's City Park

Fumes' Alleyway

Mackford's Street

Mayhem's Shopping Centre

Natalya's Scrapyard

Petra's Library

Shen-Te's Garden

Walt's Art Gallery

Grace's Fairground


And here are the animatics!


Saturday 8 December 2012

Negotiated Study 1- Backgrounds 3

I've done another today, for a total of 5 backgrounds done. I'm whizzing through these quicker than I thought, so I thought I'd put in some development screenshots to show my process.

The garage was made by hollowing out the wall, although it may not look like that.

When I work on SketchUp, it reminds me of working with a sculptor's block, as the shape has to exist first before you can make it into what you want. Here I wanted a dumpster, so for the moment it is simply a cuboid.

You then have to draw the section you want to chop off.

Deleting the corner lines then forces the cuboid to join at the points you drew underneath. And there you have a basic dumpster.

Here, I was making a trash can, using the same method as the vase in the previous Art Gallery stage. You make the cross section shape, then draw a circle at the point of rotation and then use 'Follow Me' Tool. Simple!
This is Fumes' stage, the Alleyway. I've yet to make the texture for the dumpster.

Negotiated Study 1- Backgrounds 2

I've done more backgrounds on SketchUp, and to my surprise, I'm finding it lots of fun modelling backgrounds using this tool. Despite being really simple, SketchUp allows for creative solutions to modelling things and I also get to draw my own textures.

Three more backgrounds have been done, but they are missing a few textures that I have yet to create. One in particular was challenging as I wanted to create a 3D vase, which proved to be quite tricky, but after finding this easy tutorial, I was able to make a very nice vase model.

I have added a different lighting setting to indicate a skylight in the room. Tables have now been added, as well as cardboard boxes, to fill up the otherwise vacant library.

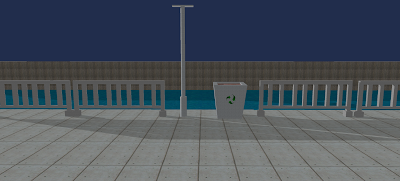
This is Grace's fighting stage, a paved area outside a large funfair. Everything is finished except the most important thing of all: the nighttime backdrop that will showcase the extravagant funfair.
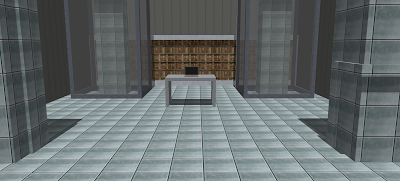
This is Alexandre's fighting stage, a large server room. The textures for the towers however are missing, and I have yet to add more wires and circuits.
This is Walt's fighting stage, an art gallery. This one was relatively simple, with the exception of the vase. There are still some improvements to do, as there is a clock I want to add on the olive wall in the background, and a mask exhibit to the right of the vase.

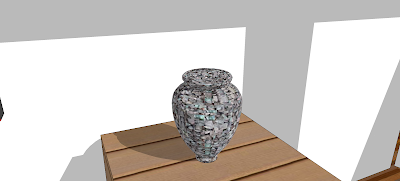
The vase proved to be tricky at first glance, but after viewing the tutorial, it was made by simply creating a vertical rectangle, and drawing out a cross section of the vase using lines and arcs. Deleting the rest of the rectangle and leaving the cross section, I then created a small circle at the point I wanted it to rotate to make the shape, and then it was just a matter of using the 'Follow Me' Tool to create the vase. It was far too small at first, but I selected all components that made it, and used the Scale Tool, rather than create a bigger one from scratch.


Saturday 1 December 2012

Negotiated Study 1- Backgrounds 1

December is now upon us and I'm going into full overdrive mode now to get this project completed. As the sprites are now done, I'm going ahead on the pseudo-3D backgrounds. In SketchUp, I've reconstructed the background I envisioned in my sketches to scale, and then began texturing it. The objective here is to get a 2D image that I can polish in Photoshop to make the final background. It will then be shrunk down to the resolution of the Nintendo 3DS.

Here's the process on my first background:

First off, I created a basic plane with intersecting walls.

Then, I created the bookshelves in the same positions as in my sketch, making sure they are symmetrical on both sides.

To verify this, I positioned the camera in the same place as it appears in my sketch.

I then add the arcs of each bookshelf.

The doors and windows are added and checked appropriately. I then start to add basic colour and textures.

I position the camera at the envisioned pose and this is roughly what the final shot would look like. I have yet to make textures for the bookshelves, and I have to remove the black edges from the model too.